 华夏名网帮助中心
准备
工程截图
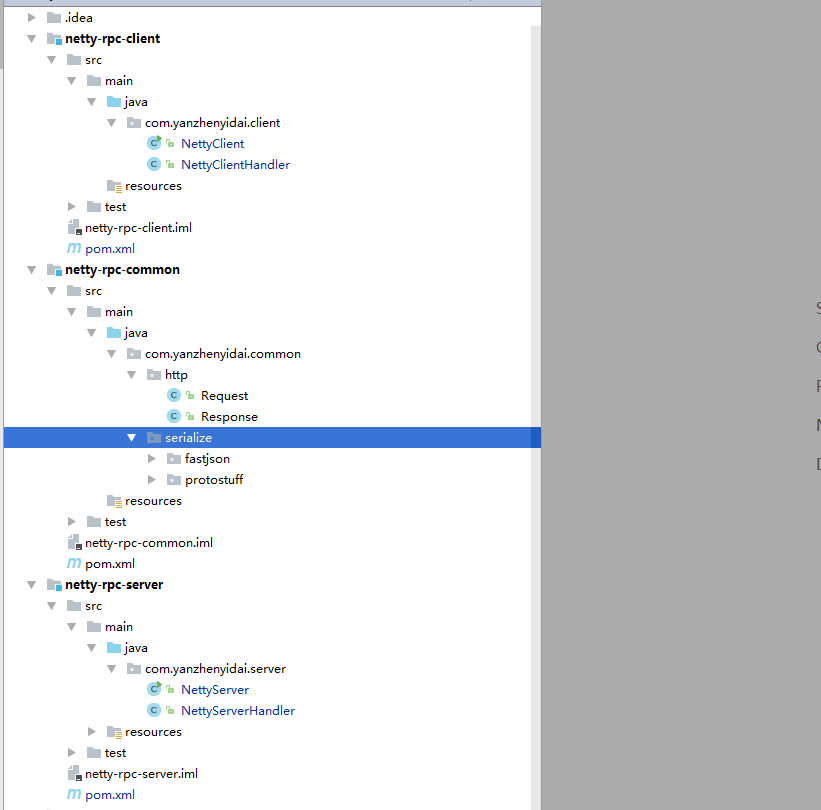
模块详解
- rpc-common
rpc-common作为各个模块都需使用的模块,工程中出现的是一些通信时请求的参数以及返回的参数,还有一些序列化的工具。
- rpc-client
rpc-client中目前只是单单的一个NettyClient启动类。
- rpc-server
rpc-client中目前也只是单单的一个NettyServer服务启动类。
需要的依赖
目前所有的依赖项都出现在 rpc-common 下的 pom.xml中。
<dependencies>
    <!-- Netty -->
    <dependency>
        <groupId>io.netty</groupId>
        <artifactId>netty-all</artifactId>
        <version>4.1.10.Final</version>
    </dependency>

    <dependency>
        <groupId>org.slf4j</groupId>
        <artifactId>slf4j-log4j12</artifactId>
        <version>1.7.25</version>
    </dependency>

    <!-- Protostuff -->
    <dependency>
        <groupId>com.dyuproject.protostuff</groupId>
        <artifactId>protostuff-core</artifactId>
        <version>1.0.9</version>
    </dependency>

    <dependency>
        <groupId>com.dyuproject.protostuff</groupId>
        <artifactId>protostuff-runtime</artifactId>
        <version>1.0.9</version>
    </dependency>

    <!-- Objenesis -->
    <dependency>
        <groupId>org.objenesis</groupId>
        <artifactId>objenesis</artifactId>
        <version>2.1</version>
    </dependency>

    <!-- fastjson -->
    <dependency>
        <groupId>com.alibaba</groupId>
        <artifactId>fastjson</artifactId>
        <version>1.2.38</version>
    </dependency>
</dependencies>
实现
首先我们在common中先定义本次的Request和Response的基类对象。
public class Request {

    private String requestId;

    private Object parameter;

    public String getRequestId() {
        return requestId;
    }

    public void setRequestId(String requestId) {
        this.requestId = requestId;
    }

    public Object getParameter() {
        return parameter;
    }

    public void setParameter(Object parameter) {
        this.parameter = parameter;
    }
}

public class Response {

    private String requestId;

    private Object result;

    public String getRequestId() {
        return requestId;
    }

    public void setRequestId(String requestId) {
        this.requestId = requestId;
    }

    public Object getResult() {
        return result;
    }

    public void setResult(Object result) {
        this.result = result;
    }
}
使用fastJson进行本次序列化
Netty对象的序列化转换很好懂, ByteToMessageDecoder 和 MessageToByteEncoder 分别只要继承它们,重写方法后,获取到Object和Byte,各自转换就OK。
不过如果是有要用到生产上的同学,建议不要使用 fastJson,因为它的漏洞补丁真的是太多了,可以使用google的 protostuff。
public class RpcDecoder extends ByteToMessageDecoder {

    // 目标对象类型进行解码
    private Class<?> target;

    public RpcDecoder(Class target) {
        this.target = target;
    }

    @Override
    protected void decode(ChannelHandlerContext ctx, ByteBuf in, List<Object> out) throws Exception {
        if (in.readableBytes() < 4) {   // 不够长度丢弃
            return;
        }
        in.markReaderIndex();   // 标记一下当前的readIndex的位置
        int dataLength = in.readInt();  // 读取传送过来的消息的长度。ByteBuf 的readInt()方法会让他的readIndex增加4

        if (in.readableBytes() < dataLength) {  // 读到的消息体长度如果小于我们传送过来的消息长度,则resetReaderIndex. 这个配合markReaderIndex使用的。把readIndex重置到mark的地方
            in.resetReaderIndex();
            return;
        }
        byte[] data = new byte[dataLength];
        in.readBytes(data);

        Object obj = JSON.parseObject(data, target);    // 将byte数据转化为我们需要的对象
        out.add(obj);
    }
}

public class RpcEncoder extends MessageToByteEncoder {

    //目标对象类型进行编码
    private Class<?> target;

    public RpcEncoder(Class target) {
        this.target = target;
    }

    @Override
    protected void encode(ChannelHandlerContext ctx, Object msg, ByteBuf out) throws Exception {
        if (target.isInstance(msg)) {
            byte[] data = JSON.toJSONBytes(msg);    // 使用fastJson将对象转换为byte
            out.writeInt(data.length);  // 先将消息长度写入,也就是消息头
            out.writeBytes(data);   // 消息体中包含我们要发送的数据
        }
    }

}
NetyServer
public class NettyServerHandler extends ChannelInboundHandlerAdapter {

    @Override
    public void channelRead(ChannelHandlerContext ctx, Object msg) throws Exception {
        Request request = (Request) msg;

        System.out.println("Client Data:" + JSON.toJSONString(request));

        Response response = new Response();
        response.setRequestId(request.getRequestId());
        response.setResult("Hello Client !");

        // client接收到信息后主动关闭掉连接
        ctx.writeAndFlush(response).addListener(ChannelFutureListener.CLOSE);
    }

    @Override
    public void channelReadComplete(ChannelHandlerContext ctx) throws Exception {
        ctx.flush();
    }

    @Override
    public void exceptionCaught(ChannelHandlerContext ctx, Throwable cause) throws Exception {
        ctx.close();
    }
}

public class NettyServer {

    private static final Logger logger = LoggerFactory.getLogger(NettyServer.class);

    private String ip;
    private int port;

    public NettyServer(String ip, int port) {
        this.ip = ip;
        this.port = port;
    }

    public void server() throws Exception {

        EventLoopGroup bossGroup = new NioEventLoopGroup();
        EventLoopGroup workerGroup = new NioEventLoopGroup();

        try {

            final ServerBootstrap serverBootstrap = new ServerBootstrap();

            serverBootstrap.group(bossGroup, workerGroup)
                    .channel(NioServerSocketChannel.class)
                    .option(ChannelOption.SO_BACKLOG, 1024)
                    .option(ChannelOption.SO_SNDBUF, 32 * 1024)
                    .option(ChannelOption.SO_RCVBUF, 32 * 1024)
                    .option(ChannelOption.SO_KEEPALIVE, true)
                    .childHandler(new ChannelInitializer<SocketChannel>() {
                        protected void initChannel(SocketChannel socketChannel) throws Exception {
                            socketChannel.pipeline().addLast(new RpcDecoder(Request.class))
                                    .addLast(new RpcEncoder(Response.class))
                                    .addLast(new NettyServerHandler());
                        }
                    });

            serverBootstrap.childOption(ChannelOption.SO_KEEPALIVE, true);  // 开启长连接

            ChannelFuture future = serverBootstrap.bind(ip, port).sync();

//            if (future.isSuccess()) {
//
//                new Register().register("/yanzhenyidai/com.yanzhenyidai.server", ip + ":" + port);
//            }

            future.channel().closeFuture().sync();
        } finally {
            bossGroup.shutdownGracefully();
            workerGroup.shutdownGracefully();
        }
    }

    public static void main(String[] args) throws Exception {
        new NettyServer("127.0.0.1", 20000).server();
    }
}
关键名词:
- EventLoopGroup
- workerGroup
- bossGroup
Server端的EventLoopGroup分为两个,一般workerGroup作为处理请求,bossGroup作为接收请求。
- ChannelOption
- SO_BACKLOG
- SO_SNDBUF
- SO_RCVBUF
- SO_KEEPALIVE
以上四个常量作为TCP连接中的属性。
- ctx.writeAndFlush(response).addListener(ChannelFutureListener.CLOSE);
NettyServerHandler中出现的
ChannelFutureListener.CLOSE,作为Server端主动关闭与Client端的通信,如果没有主动Close,那么NettyClient将会一直处于阻塞状态,得不到NettyServer的返回信息。
NettyClient
public class NettyClient extends SimpleChannelInboundHandler<Response> {

    private final String ip;
    private final int port;
    private Response response;

    public NettyClient(String ip, int port) {
        this.ip = ip;
        this.port = port;
    }

    @Override
    public void exceptionCaught(ChannelHandlerContext ctx, Throwable cause) throws Exception {
        ctx.close();
    }

    @Override
    protected void channelRead0(ChannelHandlerContext channelHandlerContext, Response response) throws Exception {
        this.response = response;
    }

    public Response client(Request request) throws Exception {
        EventLoopGroup group = new NioEventLoopGroup();

        try {

            // 创建并初始化 Netty 客户端 Bootstrap 对象
            Bootstrap bootstrap = new Bootstrap();
            bootstrap.group(group);
            bootstrap.channel(NioSocketChannel.class);
            bootstrap.handler(new ChannelInitializer<SocketChannel>() {
                @Override
                public void initChannel(SocketChannel channel) throws Exception {
                    ChannelPipeline pipeline = channel.pipeline();

                    pipeline.addLast(new RpcDecoder(Response.class));
                    pipeline.addLast(new RpcEncoder(Request.class));
                    pipeline.addLast(NettyClient.this);
                }
            });
            bootstrap.option(ChannelOption.TCP_NODELAY, true);


//            String[] discover = new Discover().discover("/yanzhenyidai/com.yanzhenyidai.server").split(":");

            // 连接 RPC 服务器
            ChannelFuture future = bootstrap.connect(ip, port).sync();

            // 写入 RPC 请求数据并关闭连接
            Channel channel = future.channel();

            channel.writeAndFlush(request).sync();
            channel.closeFuture().sync();

            return response;
        } finally {
            group.shutdownGracefully();
        }
    }

    public static void main(String[] args) throws Exception {
        Request request = new Request();
        request.setRequestId(UUID.randomUUID().toString());
        request.setParameter("Hello Server !");
        System.out.println(JSON.toJSONString(new NettyClient("127.0.0.1", 30000).client(request)));
    }
}
测试
如果以上所有内容都准备就绪,那么就可以进行调试了。
启动顺序,先启动NettyServer,再启动NettyClient。